If you picked this method from the tutorial introduction to FlowEngine on AWS, it means you are going to use subscribe to our FlowEngine solution and pay as you go.
This tutorial does not focus on the rest of your infrastructure, so you will need to manually upload a dataset to an S3 bucket you have access to, either using your own photos and settings, or you can use this extremely small archive (600KB) as a quick test. Simply upload it to an S3 bucket in order to be able to test the FlowEngine on AWS solution.
You will still be able to customize your backend (as in, how to schedule reconstruction tasks and how to scale up in case of a workload increase) on amazon, but you will be using pre-configured FlowEngine docker containers hence you will be constrained by what these container images expect the data to be fed in and out.
This tutorial has been updated for the FlowEngine preview 5.912 version.
Subscribing to FlowEngine in the Amazon Marketplace
Login or create an AWS account, then proceed to the official FlowEngine AWS page.
Click “Continue to subscribe” and follow the process, in order to get access to FlowEngine for your account.
Setting up your amazon credentials
We will be running a task on an ECS cluster, so we first must setup the appropriate IAM roles. We will create an IAM “service role” for the task role and execution role, then with the role applied, the task will have access to AWS resources specified in the policy. This decouples permissions from a specific user account, they can be updated on the fly, and most importantly it avoids passing around plain text credentials. There are two roles for the tasks to be aware of:
The “Task Execution Role”: this role is required by tasks to pull ECR containers and publish CloudWatch logs. The console can auto create this role and will assign this managed policy: AmazonECSTaskExecutionRolePolicy
The “Task Role”: this is the role that will provide access in place of your AWS credentials. It will need proper S3 permissions such as AmazonS3FullAccess as we will use S3 for input and output, as well as AWSMarketplaceMeteringRegisterUsage, as FlowEngine will not run if it not capable of registering the proper billing on your subscription.
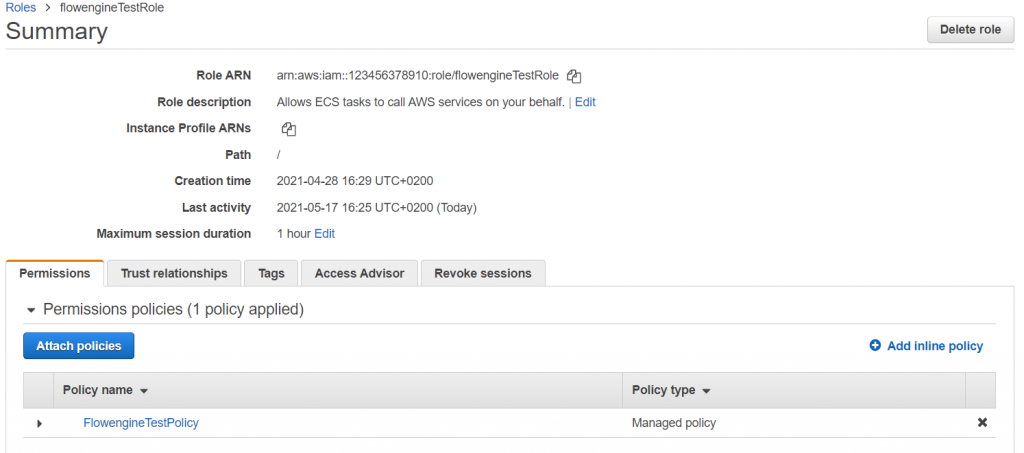
Proceed in your IAM Management console to create the proper role:

Make sure to have the correct policy attached to your role:
Creating the task definition
Before we can run FlowEngine, we must define a task in the ECS dashboard. A task can then be run from the AWS web interface or can be automated using Amazon’s SDK. For the purpose of this tutorial, we will run all tasks directly from the web interface, although you will probably want to automate this whole process.
Select “Create new Task Definition” after selecting “Task Definitions” on the left menu.

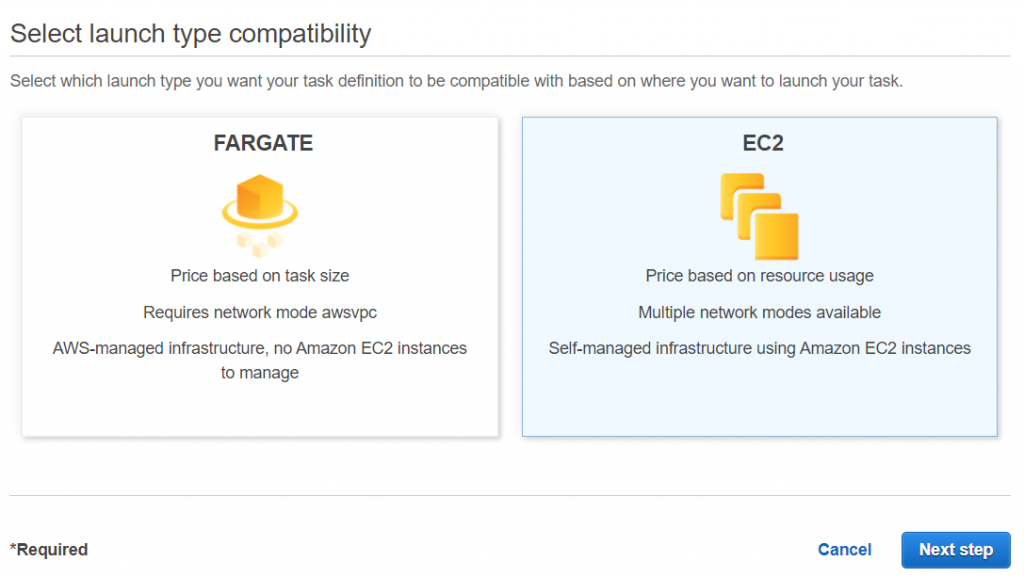
Select ‘EC2’ and then click on ‘Next Step’
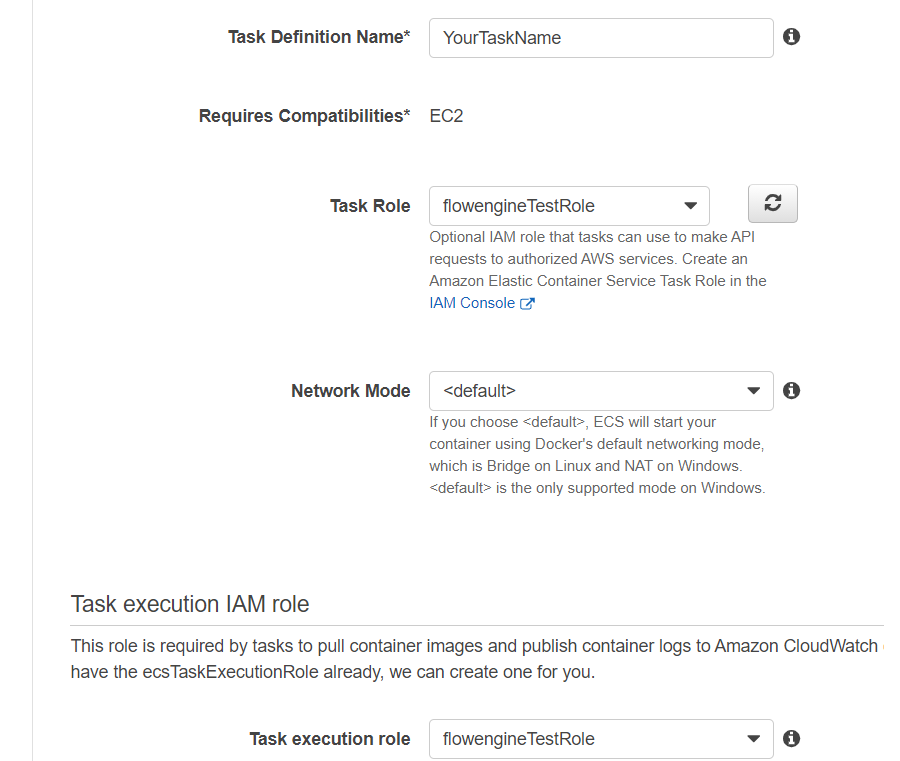
The next page of the wizard will guide you through the setup. While it is up to you to pick the desired vCPU and RAM parameters that will be used by the task, there are some other fields you should be aware of.
Make sure that your task is using the previously created roles by selecting them in both the dedicated dropdown menus. Not having the right permissions will result in your task fail immediately.
Click “Add Container” – this is where we will define which version of FlowEngine you will be using. Whenever we release a new version, it is up to you to choose if you want to upgrade (which is always suggested as our updates will include all our technology updates to make the processing faster, more accurate and with better quality, as well as extending the FlowEngineAWS available functions to you) as new version may break your integration. It is suggested to create different revisions in those cases, so you can test the new deployment before upgrading it to production.

The following page will guide you through the setup of the FlowEngine pre-built container. Make sure to input the righe values for all of them, specifically pay attention to:
- Image: the actual uri of the container you have subscribed to. Check the FlowEngine product page for more information, however, it will look something like 709825985650.dkr.ecr.us-east-1.amazonaws.com/3dflow/flowengine:fe6002_03
- Memory Limits: make sure to pick a proper limit depeding on the choice of the underlying hardware and type of tasks.
- GPUs: this field is under the “ENVIRONMENT” category – not setting this value will run FlowEngine in cpu mode only, which is going to be very slow. Make sure to select the proper amount of GPUs you want FlowEngine to run on. In general, this is the maximum amount of GPUs offered by the underlying hardware, but it is entirely up to you.
Most of the other fields can be left blank, but of course make sure that they meet your architecture expectations. Click ‘Add’ to proceed. Congratulations! You have setup your FlowEngine task and are now ready to create your cluster!
Creating the ECS cluster
Once again from the ECS dashboard, click create Cluster.

Select ‘EC2 Linux+Networking’ and select ‘Next step’. The wizard will guide you through the necessary parameters – make sure to select a proper instance type for your task. The hardware specifications are available at this page. For a small reconstruction task, g4dn.xlarge for example is a good candidate as it is GPU powered and has overall good performances at a very reasonable price.
Before clicking ‘Create’ be aware you will need to select an appropriate role here as well (you can create a new one directly from the dropdown menu if you do not have one already) and you may want to check the ‘CloudWatch container insights’ options. FlowEngine’s log will be displayed in ‘CloudWatch container insights’ and AWS has a generous 5GB free plan for Cloudwatch, so it is generally a good idea to have that option checked.
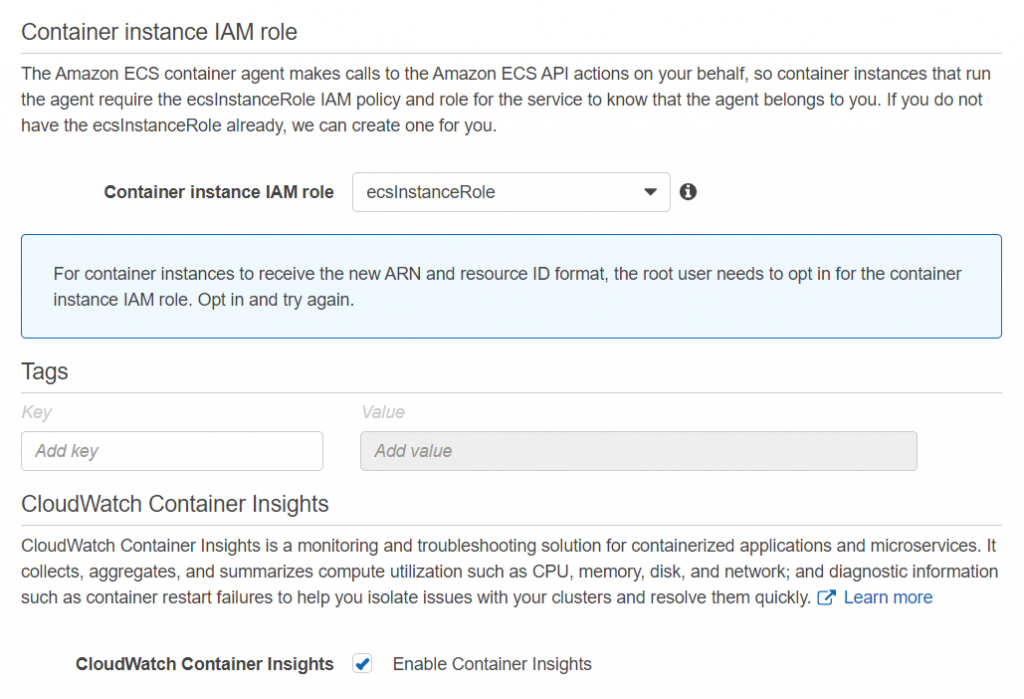
Click create when ready and wait for AWS to create your cluster. Note that an EC2 instance will be automatically spawned and you will be billed accordingly for the instance use, regarldess of the running tasks. It is up to you to handle your instance(s) and task(s) in the AWS environment.
Congratulations! You have created your cluster and are now ready to process data using FlowEngine. Click ‘View Cluster’ or go back to your dashboard and select your cluster to run tasks.
Running Tasks
This pre-packaged version of FlowEngine for AWS expects data in a certain format for input and output. Please refer to this page (TODO) in order to view the capabilities and requirements of each available version on the AWS marketplace. Flowengine expects all the data of a project in a specific S3 directory in the format projectname/projectname.zip.
The basic capabilities require you to upload your data and settings as .zip file to an S3 bucket (which is why in the previous steps we allowed the role to access your S3 buckets via your credentials). The reconstruction will then output a .3dk file in the same bucket directory.
This way, you can have multiple project ready and queued as you need. Make sure to upload a .zip file that conatins your settings (in this case, Default.xml) as well as enough photos. You can use this test file (with very low resolution photos to have a quick test run) if you want or use your own. Make sure it is uploaded in your S3 bucket.
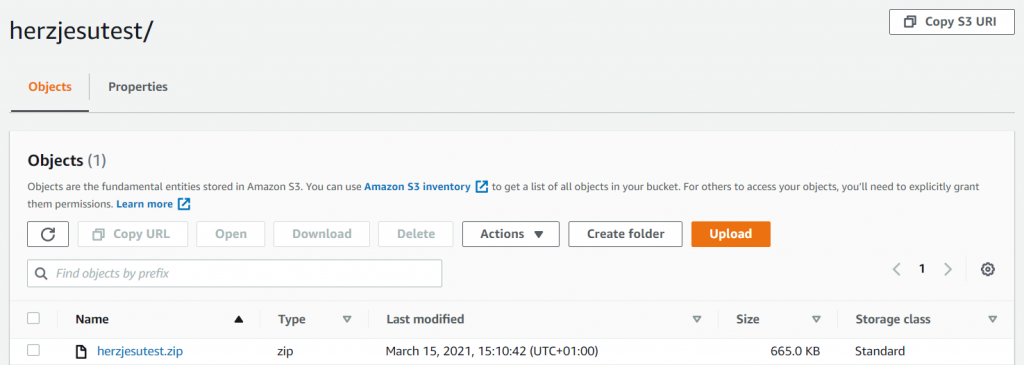
Once you have made sure your data are on an S3 bucket that your task role has access to, go back into your cluster panel and select “Run New Task”:
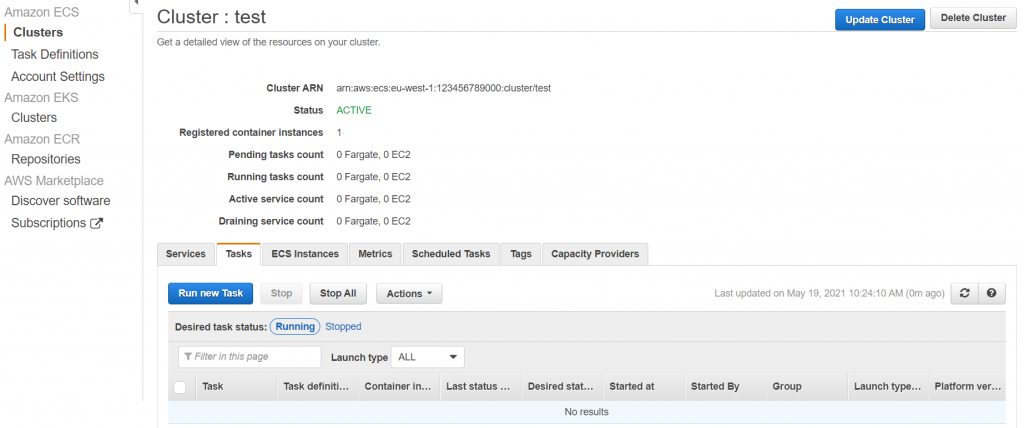
Select ‘EC2’ as instance type and your previously defined task in the ‘Task Definition’ family and eventually a desired revision. This allows you to easily move back and forth between the available FlowEngine versions and task revisions you have setup.
The ‘Advanced’ options should automatically have picked up both your Taks Role and Task Execution Role from the previously defined task. Make sure this is the case, then expand the ‘Container Overrides’ field by clicking on it
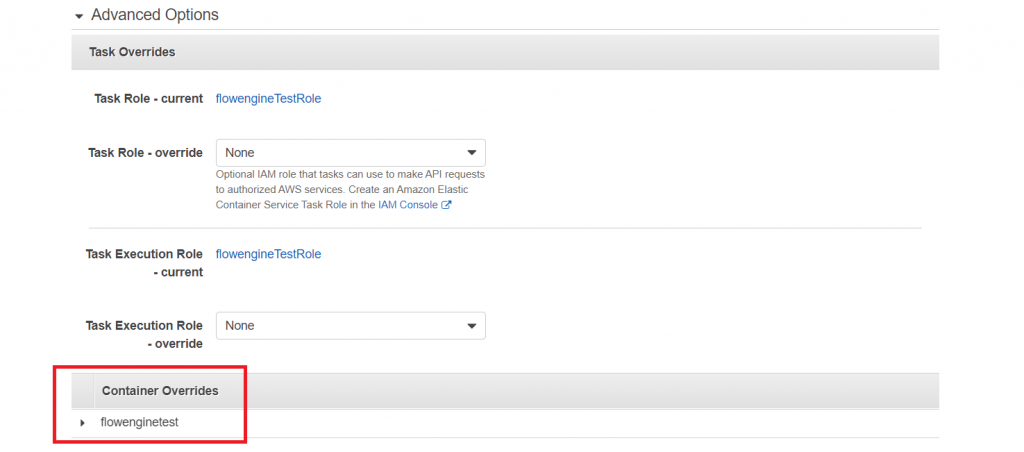
Once expanded you will be able to control your task by filling the environment variable fields.
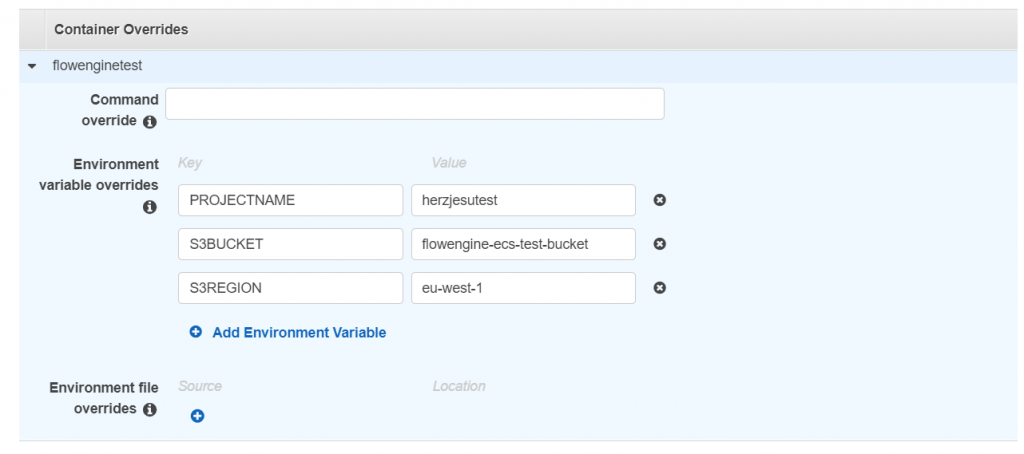
- PROJECTNAME: this is a required field. It must match the directory name and zip file base name.
- S3BUCKET: this is a required field. It must match the name of the S3 bucket to look for.
- S3REGIONThis is an optional field. It will look for the S3BUCKET bucket in a different region than the one in which the current instance is running.
The above parameters control just the environment, and by default, flowengine will expect a Default.xml file along with the images, and will process from sparse point cloud to textured mesh, and export the workspace as .3dk. You can however control the FlowEngine behavior by simply defining the following additional environment variables:
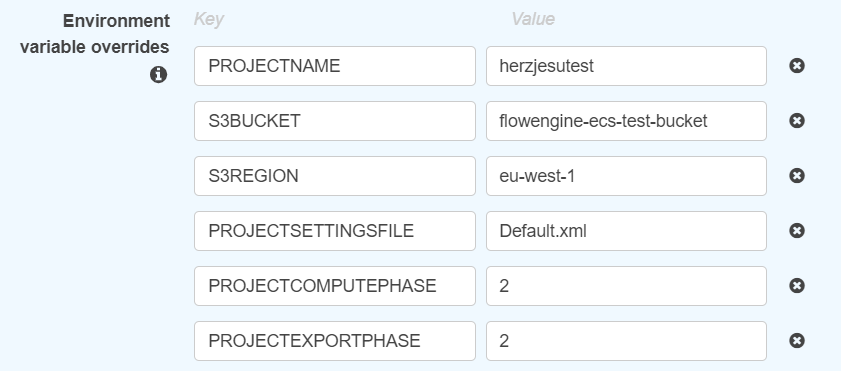
- PROJECTSETTINGSFILE: this is an optional field. It specifies the name of the reconstruction settings that FlowEngine will look for after extracting the .zip file.
- PROJECTCOMPUTEPHASE: this is an optional field and controls what FlowEngine will reconstruct. It accepts integer values between 1 and 4 (included) as it is an enumerator. Input “1” to stop the processing after computing the sparse point cloud, “2” to stop the processing after computing the dense point cloud, “3” to stop the processing after computing the mesh, and “4” to stop the processing after computing the textured mesh. Defaults to “4” (texture) if the parameter is not present or invalid.
- PROJECTEXPORTPHASE: This is an optional field. It controls what FlowEngine should export. It accepts integer values between 0 and 5 (included) as it is an enumerator. Input “0” to export the .3dk file (workspace.3dk), “1” to export the sparse point cloud as .ply file (sparse.ply), “2” to export the dense point cloud as .ply file (dense.ply), “3” to export the mesh as .ply file (mesh.ply), “4” to export the textured mesh as obj/mtl files (texturedMesh.obj and relative mtl file and texture), and “5” to export everything. Defaults to “0” (3dk export) if the parameter is not present or invalid.
In the example above, FlowEngine will stop processing after computing the dense point cloud (2) and will upload the dense point cloud as .ply format (2) in the specified bucket in the specified region.
Click “Run Task” to start the processing. Flowengine will then upload the desired output (in the above example, a dense point cloud named “dense.ply”) to your S3BUCKET bucket in the format S3BUCKET/PROJECTNAME/output (where output, in the above example, is dense.ply)

The first time you run a task it will take a few seconds to start and will seem stuck in the ‘PENDING’ state as the container has to be prepared. Subsequent runs will start almost immediately.
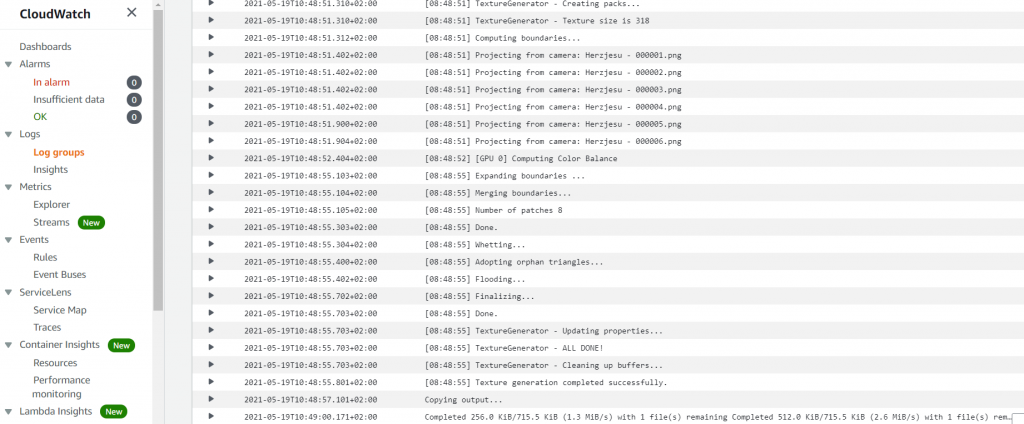
Even while the task is running, you can see realtime logs in your CloudWatch Dashboard if you set your cluster to do so.
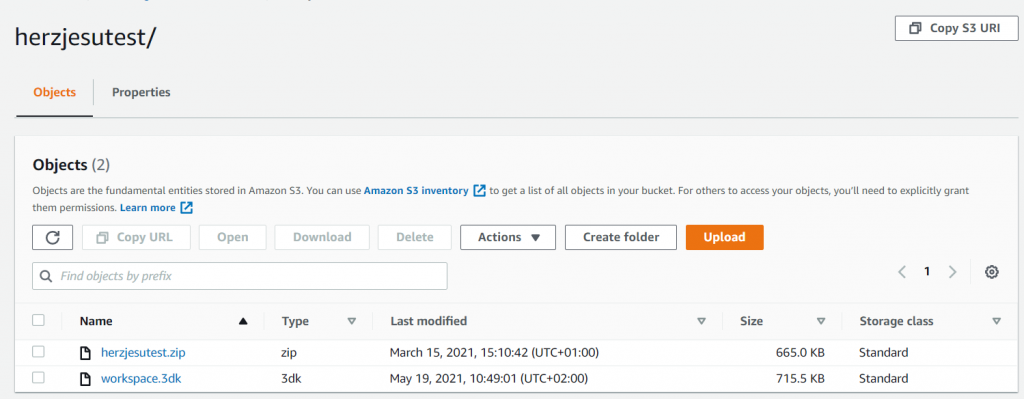
When the task is finished, you will find your finished project in the S3 bucket.
Keep in mind your cluster (and relative EC2 instance) will still be running after your task has been completed so make sure to handle that according to your needs and delete the cluster if necessary. Having already set the task, recreating the cluster is now a matter of few clicks.
What’s next?
You can now proceed in developing your own custom solution using the AWS SDK so that you an spin up new clusters/instances/tasks as required.
This pre-packaged version of FlowEngine for AWS does not offer currently many customization options, but will be improved and expanded overtime. Please make sure to reach out to support@3dflow.net if you have specific needs that you’d like to discuss.


